Virtualisation tools
The virt-manager source contains not only virt-manager itself but also a collection of further helpful tools like virt-install, virt-clone and virt-viewer.
Virtual Machine Manager
The virt-manager package contains a graphical utility to manage local and remote virtual machines. To install virt-manager, enter:
sudo apt install virt-manager
Since virt-manager requires a Graphical User Interface (GUI) environment it is recommended to install it on a workstation or test machine instead of a production server. To connect to the local libvirt service enter:
virt-manager
You can connect to the libvirt service running on another host by entering the following in a terminal prompt:
virt-manager -c qemu+ssh://virtnode1.mydomain.com/system
Note:
The above example assumes that SSH connectivity between the management system and the target system has already been configured, and uses SSH keys for authentication. SSH keys are needed because libvirt sends the password prompt to another process.
virt-manager guest lifecycle
When using virt-manager it is always important to know the context you’re looking at. The main window initially lists only the currently-defined guests. You’ll see their name, state and a small chart on CPU usage.
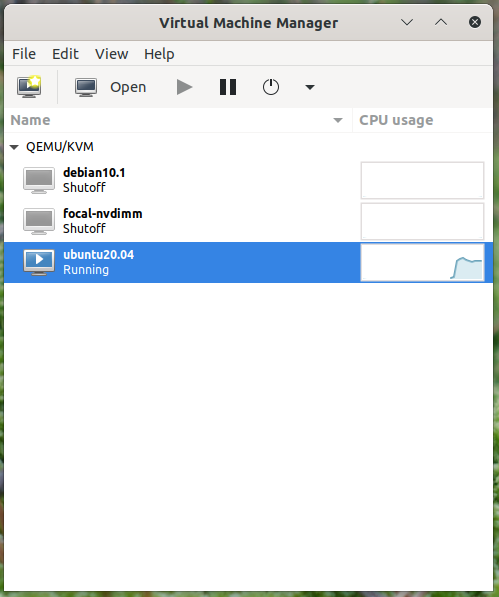
In that context there isn’t much one can do except start/stop a guest. However, by double-clicking on a guest or by clicking the open button at the top one can see the guest itself. For a running guest that includes the guest’s main-console/virtual-screen output.

If you are deeper in the guest config a click in the top left onto “show the graphical console” will get you back to this output.
virt-manager guest modification
virt-manager provides a GUI-assisted way to edit guest definitions which can be handy. To do so, the per-guest context view will have “show virtual hardware details” at the top. Here a user can edit the virtual hardware of the guest, which will alter the guest representation behind the scenes.

The UI edit is limited to the features known to (and supported by) that GUI feature. Not only does libvirt grow features faster than virt-manager can keep up – adding every feature would also overload the UI and render it unusable. To strike a balance between the two, there also is the XML view which can be reached via the “edit libvirt XML” button.

By default this will be read-only and you can see what the UI-driven actions have changed, but one can allow read-write access in this view via the preferences. This is the same content that the virsh edit of the libvirt-client exposes.
Virtual Machine Viewer
The virt-viewer application allows you to connect to a virtual machine’s console like virt-manager, but reduced to the GUI functionality. virt-viewer does require a GUI to interface with the virtual machine.
To install virt-viewer from a terminal enter:
sudo apt install virt-viewer
Once a virtual machine is installed and running you can connect to the virtual machine’s console by using:
virt-viewer <guestname>
The UI will be a window representing the virtual screen of the guest, just like with virt-manager above, but without the extra buttons and features around it.

Similar to virt-manager, virt-viewer can connect to a remote host using SSH with key authentication, as well:
virt-viewer -c qemu+ssh://virtnode1.mydomain.com/system <guestname>
Be sure to replace web_devel with the appropriate virtual machine name.
If configured to use a bridged network interface you can also setup SSH access to the virtual machine.
virt-install
virt-install is part of the virtinst package. It can help with installing classic ISO-based systems and provides a CLI for the most common options needed to do so. To install it, from a terminal prompt enter:
sudo apt install virtinst
There are several options available when using virt-install. For example:
virt-install -n web_devel -r 8192 \
--disk path=/home/doug/vm/web_devel.img,bus=virtio,size=50 \
-c focal-desktop-amd64.iso \
--network network=default,model=virtio \
--graphics vnc,listen=0.0.0.0 --noautoconsole -v --vcpus=4
There are many more arguments that can be found in the man page. However, explaining those of the example above one by one:
-
-n web_devel
The name of the new virtual machine will beweb_develin this example. -
-r 8192
Specifies the amount of memory the virtual machine will use in megabytes. -
--disk path=/home/doug/vm/web_devel.img,bus=virtio,size=50
Indicates the path to the virtual disk which can be a file, partition, or logical volume. In this example a file namedweb_devel.imgin the current user’s directory, with a size of 50 gigabytes, and usingvirtiofor the disk bus. Depending on the disk path,virt-installmay need to run with elevated privileges. -
-c focal-desktop-amd64.iso
File to be used as a virtual CD-ROM. The file can be either an ISO file or the path to the host’s CD-ROM device. -
--network
Provides details related to the VM’s network interface. Here the default network is used, and the interface model is configured forvirtio. -
--graphics vnc,listen=0.0.0.0
Exports the guest’s virtual console using VNC and on all host interfaces. Typically servers have no GUI, so another GUI-based computer on the Local Area Network (LAN) can connect via VNC to complete the installation. -
--noautoconsole
Will not automatically connect to the virtual machine’s console. -
-v: creates a fully virtualised guest. -
--vcpus=4: allocate 4 virtual CPUs.
After launching virt-install you can connect to the virtual machine’s console either locally using a GUI (if your server has a GUI), or via a remote VNC client from a GUI-based computer.
virt-clone
The virt-clone application can be used to copy one virtual machine to another. For example:
virt-clone --auto-clone --original focal
Options used:
-
--auto-clone
To havevirt-clonecreate guest names and disk paths on its own. -
--original
Name of the virtual machine to copy.
Also, use the -d or --debug option to help troubleshoot problems with virt-clone.
Replace focal with the appropriate virtual machine names of your case.
Warning:
Please be aware that this is a full clone, therefore any sorts of secrets, keys and for example/etc/machine-idwill be shared. This will cause issues with security and anything that needs to identify the machine like DHCP. You most likely want to edit those afterwards and de-duplicate them as needed.
Resources
-
See the KVM home page for more details.
-
For more information on libvirt see the libvirt home page
-
The Virtual Machine Manager site has more information on
virt-managerdevelopment.